• Register
Home  //  Media  //  J! Stuff  //  News  //  Latest

Site Shaper


So what are Site Shapers? They are quick installs of Joomla combined with all the modules, content, etc used on our demo, except stock photography. Within a few minutes you can have your site up, running and looking just like our demo. No more importing SQL dumps and installing modules. Just head on over to the download section of this template and grab a Site Shaper. Simply install the Site Shaper like any other Joomla installation, it's that easy!

How to setup a Site Shaper


Note - please read the entire tutorial. Virtuemart requires one extra step at the bottom of this tutorial.

  • Login to your cpanel or your server admin panel.
  • Locate the area where your databases are (usually labeled Mysql Databases)
  • Create a new database
  • Next create a new database user and assign it to this newly created database in the previous step
  • You will then need to extract the site shaper to either a folder on your server or the root directory such as WWW. NOTE: if you already have a website in the root of your WWW folder, we suggest creating a new folder and extract the site shaper there. If your cpanel does not have an extract option or you cannot find it, you may also extract the contents of your site shaper in to a folder on your desktop and upload all the files via an ftp client to your server.
  • Next, navigate to the url where you extracted the site shaper via your web browser.
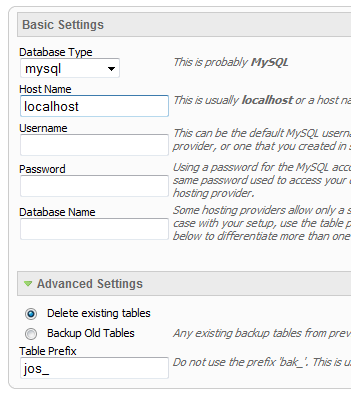
  • Continue through each screen until you reach the below screenshot:


  • At the above screen be sure to enter localhost as shown, continue to fill in the following text fields with your newly created database and username information
  • Follow through the rest of the site shaper setup and click the install sample data at the last screen and the installation is complete! (be sure to rename/remove the installation directory after finishing the install)
  • This is the final step. There is a configuration file in Virtuemart that requires the url of your site. Navigate to:

    administrator\components\com_virtuemart\virtuemart.cfg.php

    At line 35 and 36 change the following to the url of your site:

    define( 'URL', 'http://localhost/eshopper/' );
    define( 'SECUREURL', 'http://localhost/eshopper/' );

    example:

    define( 'URL', 'http://www.mysite.com/' );
    define( 'SECUREURL', 'http://www.mysite.com/' );

    Make sure that it ends with a trailing / at the end.

    Save the file and the installation is complete!



SQL Dumps


It is highly recommended that you use a Site Shaper if you want to get your site looking like our demos. If you just want the data we have used then an SQL dump is for you.

  • Login to your phpmyadmin via cpanel or another server database admin panel.
  • Navigate to the database your Joomla install is using
  • Select all tables and drop them. (NOTE: This will delete all your website data on this current Joomla install)
  • Next, click import and import the SQL dump we provide
  • Now you are done, just login via your Joomla admin with username=admin and password=admin
 

Note - The tool tips script is by default disabled. If you wish to use it you must enable this script in the template's configuration area. This also includes site shaper installations.

Demo 1:
<a onmouseover="Tip('This is a sample tooltip.', WIDTH, 140, OPACITY, 80, ABOVE, true, OFFSETX, 1, FADEIN, 200, FADEOUT, 300,SHADOW, true, SHADOWCOLOR, '#000000',SHADOWWIDTH, 2, BGCOLOR, '#000000',BORDERCOLOR, '#000000',FONTCOLOR, '#FFFFFF', PADDING, 9)" href="http://www.shape5.com/demo/etensity/">

<img class="boxed2" alt="" src="http://www.shape5.com/demo/smart_blogger/images/tooltip.jpg"/>

</a>


Demo 2:
<a href="/index.htm" onmouseover="Tip('Image Demo

<img src=http://www.shape5.com/demo/smart_blogger/images/tooltip.jpg width=220 height=147>')">Demo 2 Image Tool Tip </a>

Demo 2 Image Tool Tip


Demo 3:
<a href="#" onmouseover="Tip('Image Demo<br /> <br /><img src=http://www.shape5.com/demo/smart_blogger/images/tooltip.jpg width=220 height=147>',SHADOW, true, BGCOLOR, '#000000', FADEIN, 400, FADEOUT, 400, SHADOWCOLOR, '#000000', BORDERCOLOR, '#000000',OPACITY, 90,FONTCOLOR, '#FFFFFF')"><strong>Demo 3 Image Tool Tip</strong></a>
Demo 3 Image Tool Tip


Fixed or Fluid Width

This template has the ability to set the entire width of your set to either a fixed pixel width or a fluid percentage width. You can set the width to any size you want.

Column Widths

You may also set the widths of the following positions to any width that you need to: left, left_inset, right, and right_inset. You may set them to any width you need to.

Row Widths

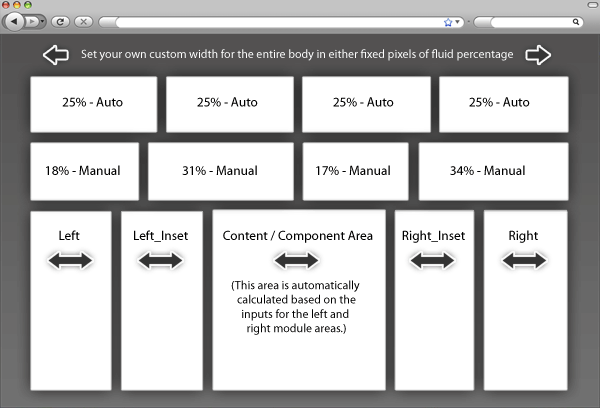
This template comes loaded with module positions, many of which appear in rows of 6 module positions. Any row that contains 6 module positions can have it's row columns set to automatic widths or manual. For example, in the picture below the first row shows 4 modules published and since it's set to automatic each is set to 25% width. The second row shows a manual calculation for each module in the row. Again, you may do this for any row that contains 6 modules. If you setup a manual calculation they must total to 100%. Not all 6 modules need to be used, as shown below.


All of this is done very easily in the template configuration.


1. Search Setup

  • Publish the default Joomla search module, or S5 Live Search module to the 'search' position.
  • Set the width of the search to 35 in the module's backend.
  • This position was only designed for search modules, not content.

2. Column Menu Setup

  • Publish any menu module to the main body module positions on your site.
  • There should be no menu style suffixes applied under advanced parameters.
  • The menu style should be set to list.
  • You may assign any of this template's module class suffixes.

3. Bottom Menu Setup

  • Publish any menu to the 'bottom_menu' position.
  • There are no menu style suffixes applied under advanced parameters.
  • The menu style should be set to list


This template comes loaded with options that you can use to customize your site exactly how you want it. Here's how to get to these custom settings:
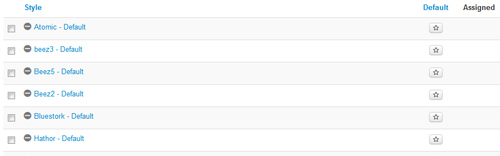
  1. In the backend of Joomla go menu item Extensions/Template Manager.
  2. Click on the title of the template.
  3. This will bring you to the template manager screen where you can edit the template's parameters.
  4. Click save when you are done


I like what I see! I want to JOIN TODAY.


Demo Information

All content and images shown on this site is for demo, presentation purposes only. Stock photos are NOT included. This site is intended to exemplify a live website and does not make any claim of any kind to the validity of non-Shape5 content, articles, images or posts published to this site.

6399 North Wells Road
Bigtownville, CO, USA 12345

Phone: 800-123-4567
Email: This e-mail address is being protected from spambots. You need JavaScript enabled to view it.
Web: www.shape5.com/demo
Scroll Up